소개
이전까지의 블로그에서는 DB 없이 백엔드에서 fs를 이용해 마크다운으로 된 포스트들을 전부 가져온 다음 매 요청마다 새로 페이지를 생성하는 방식(force-dynamic)으로 되어 있었다.
그러다 보니 포스트를 작성 또는 수정할 때마다 매번 서버에 접속해야 하는 문제도 있었고 매 요청마다 페이지를 새로 생성하기 때문에 페이지 로딩 속도도 느려지는 단점이 있었다.
이미 방문한 페이지에 다시 방문했을 때 2초 가량의 시간이 드는 것을 보고 너무 느리다는 생각이 들어 포스트를 올릴 때마다 서버에 접속해야되는 문제도 해결하고 로딩 시간도 함께 개선해보고자 블로그를 리펙토링하게 되었다.
구성
우선 fs를 이용해 포스트를 가져오는 기존 방식은 DB 없이도 블로그를 제작할 수 있는 장점이 있지만 포스트 CRUD 시 서버에 접속해서 포스트를 수정해야 하는 단점이 있었다.
DB 없이 블로그를 제작할 수 있는 장점은 유지하고 포스트 수정 시 서버에 접속해야 하는 단점은 없애기 위해 외부 서비스인 Oracle Cloud Object Storage를 이용해서 포스트를 관리하자는 생각을 했다.
NextJS의 getStaticParams를 이용하면 빌드 시에 정적 페이지를 미리 렌더링할 수 있기 때문에 빌드 전까지 포스트된 글들은 정적 페이지로 미리 렌더링하고 포스트를 새로 업로드할 때 revalidatePath를 이용해 다시 렌더링하면 방문 속도를 올릴 수 있을 것이라고 기대했다.
기능 구현
1. Oracle Cloud Object Storage 생성
먼저 Oracle Cloud Object Storage에 버킷을 생성해주었다.

Oracle Cloud 접속 > 버킷 > 버킷 생성 > 버킷 이름 지정 및 옵션 선택
버킷 안에 파일 구조는 다음과 같이 만들어주었다.

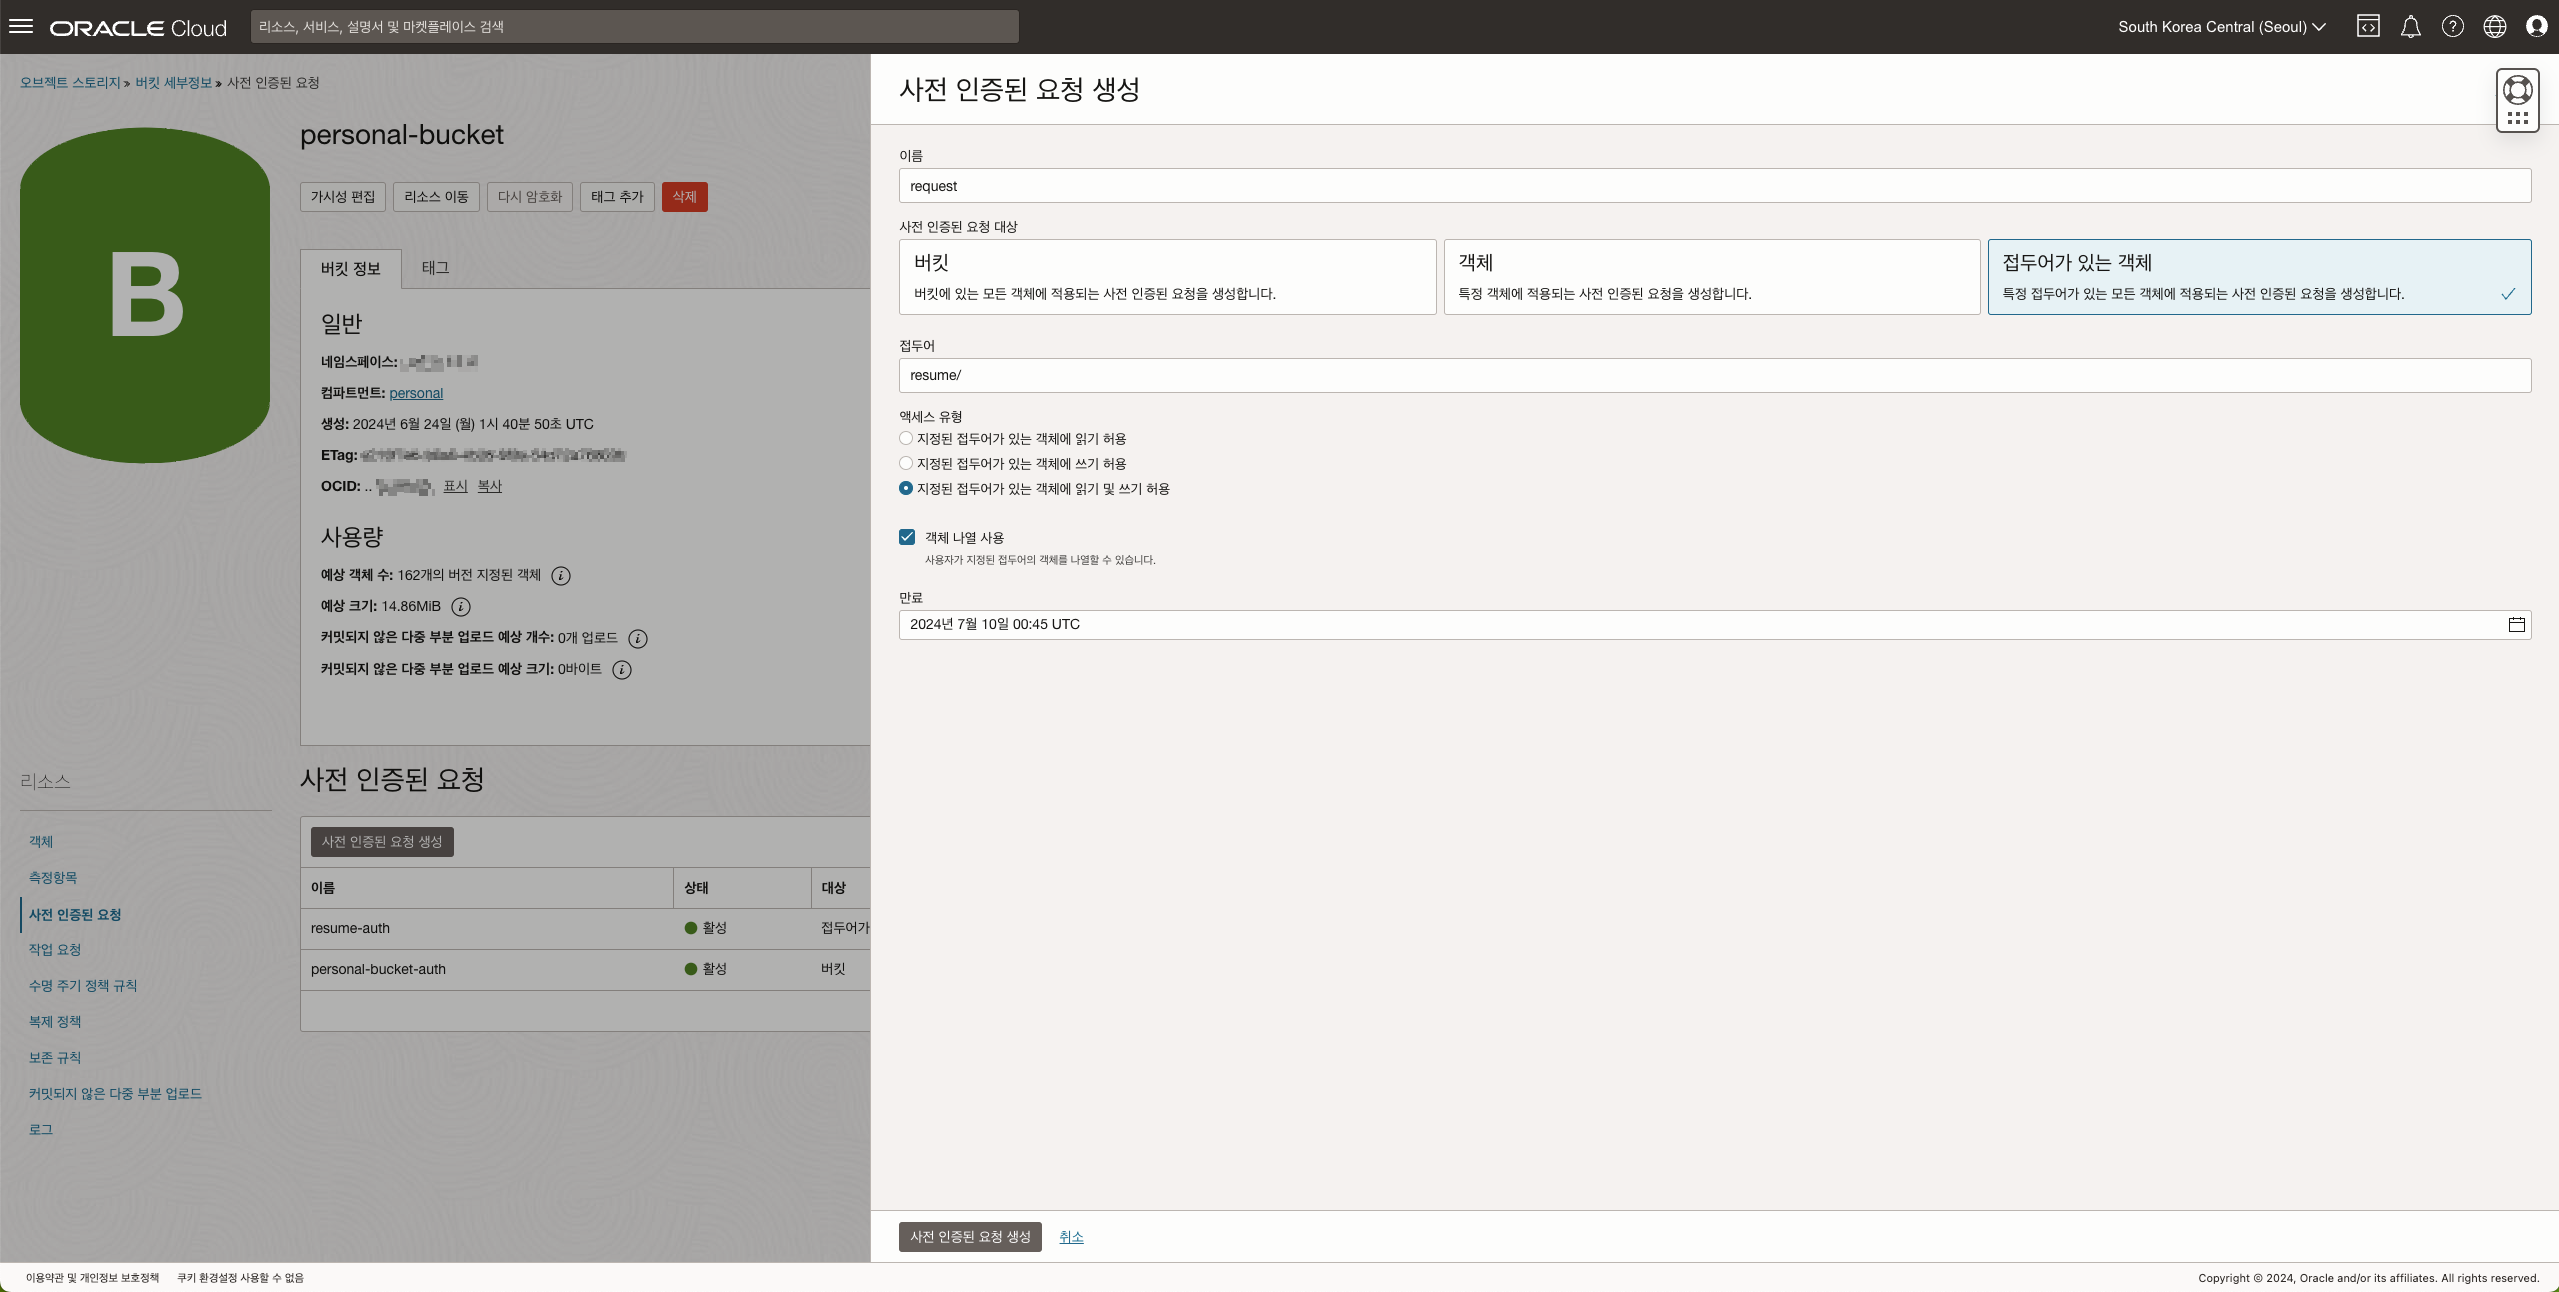
2. 사전 인증된 요청 생성
NextJS에서 Object Storage의 데이터를 가져올 수 있도록 사전 인증된 요청을 생성해줬다.
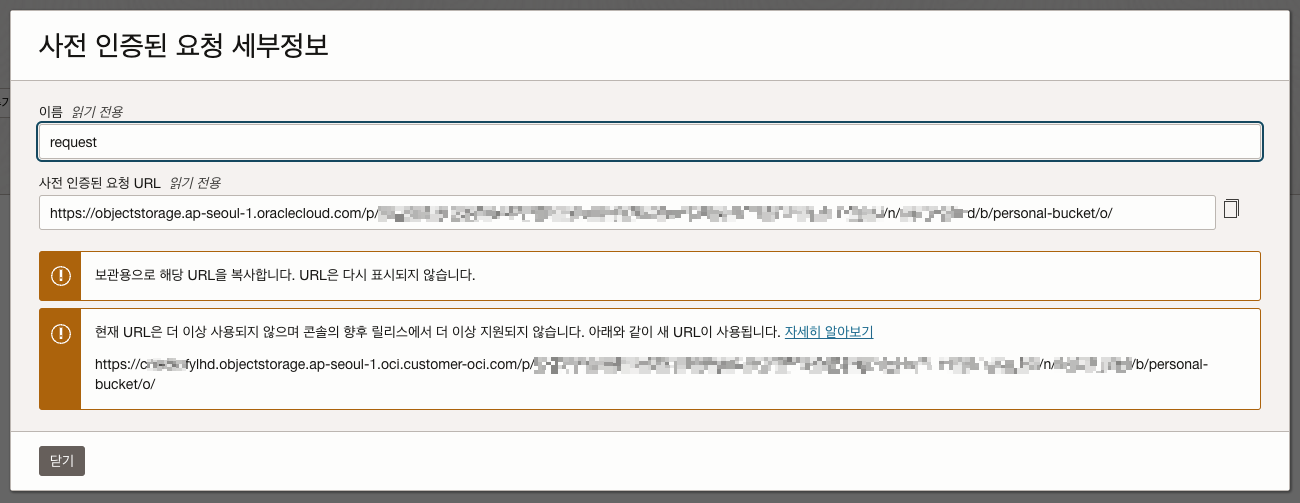
사전 인증된 요청 URL 복사
3. 버킷의 오브젝트들로 generateStaticParams 작성
URL 복사 후 .env에 넣어 환경 변수로 지정해주고 app/blog/[slug]/page.tsx에서 위 URL을 이용해 모든 포스트들을 불러 오도록 해 주었다.
복사한 URL로 접속 시 버킷 내의 모든 오브젝트의 목록을 JSON형태로 받을 수 있다.
// app/blog/[slug]/page.tsx

export async function generateStaticParams() {
	const posts = await fetch(`${process.env.BUCKET_PRE_SIGNED_URL}`).then(async (res) => {
		const data = await res.json();
		const regex = /^resume\/posts\/.+\/.+\.mdx$/;

        // regex로 해당 경로에 있는 모든 mdx파일 필터링
		return data.objects.filter((item: { name: string }) => {
			return regex.test(item.name);
		});
	});

	return posts.map((post: { name: string }) => {
        // "resume/posts/NextJS + Docker + OCI 구성기/data.mdx" 이런 식으로 추출되는데 post의 이름을 구하기 위해 /로 분리 후 뒤에서 두번째 값을 가져온다.
		const path = post.name.split('/');

		path.pop();
		const uri = path.pop();

		if (!uri) return notFound(); // uri가 없다면 404에러 페이지로 라우팅

		return {
			slug: encodeURIComponent(uri) // uri를 URIEncoding해서 slug 반환
		}
	});
}
4. slug를 이용해 동적 페이지 생성
위의 코드처럼 generateStaticParams코드를 작성하면 빌드 시 파라미터를 이용해 Object Storage에서 데이터를 받아와 미리 페이지를 렌더링 할 수 있다.(최초 접속 시의 응답 속도 향상)
렌더링한 정적 페이지로 라우팅될 수 있도록 getData 함수를 작성해 slug에 따라 라우팅하고, 새로 포스트가 등록될 시 Object Storage에서 데이터를 받아올 수 있도록 코드를 작성했다.
// app/blog/[slug]/page.tsx

const getData = async (slug: string) => {
    // slug로 Object Storage에서 해당 title을 가진 .mdx파일을 가져온다.
	const post = await fetch(`${process.env.BUCKET_PRE_SIGNED_URL}/resume/posts/${slug}/data.mdx`)
		.then((res) => {
			if (!res.ok) throw new ApiError(404, 'Not Found');  // 없다면 404에러 발생
			return res.text();
		})
		.catch((e: ApiError) => {
			if (e.statusCode === 404) return notFound(); // 404에러 페이지로 라우팅
			throw e;
		});

    // data.mdx에서 frontmatter 파싱
	const { frontmatter } = await compileMDX({
		source: post,
		options: {
			parseFrontmatter: true
		}
	});

    // frontmatter 안에 있는 데이터(제목, 생성일, 설명 등)와 함께 serialized된 mdx content 반환
	return {
		...frontmatter,
		content: await serialize(post, {
			mdxOptions: {
				remarkPlugins: [remarkGfm], // remark plugins
				rehypePlugins: [rehypePrism, rehypeSlug] // rehype plugins
			},
			parseFrontmatter: true,
		})
	};
}

// SEO를 위해 metadata 생성
export async function generateMetadata({ params }: { params: { slug: string } }) {
	const { description, title }: any = await getData(params.slug);

	return {
		title,
		authors: [{ name: '이강혁', url: 'https://presso.ac' }],
		description,
		creator: '이강혁',
		publisher: '이강혁',
		openGraph: {
			title,
			description
		}
	}
}

// ...(generateStaticParams관련 코드)

interface Params {
	params: {
		slug: string
	}
}

const Page = async ({ params }: Params) => {
    // params.slug로 data를 받아온다.
	const { content, title, date, description }: any = await getData(params.slug);

	return (
		<Container>
			<div className={"sm:mt-20 mt-6"}>
				<TOC />

				<Header title={title} date={date} description={description} />

				<div className={`my-10`}>
					<Content data={content} />
				</div>

				<Comment />
			</div>
		</Container>
	);
};

export default Page;
5. 포스트 업로드 기능 구현
사전 서명된 URL에 읽기 및 쓰기 설정이 돼있다면 PUT Method로 요청 전송 시 버킷에 파일을 업로드할 수 있다.
이를 이용해서 포스트 업로드 기능을 구현해보았다. 포스트 작성에는 MDXEditor를 사용했다.
// app/components/blog/HeaderInput.tsx
'use client';
import { useRouter } from "next/navigation";
import dayjs from "dayjs";
import { generateMDXWithFrontmatter } from "@/app/utils/mdx";
import ArrowRightUp from "@/public/icons/ArrowRightUp";
dayjs.locale("ko");
interface HeaderProps {
title: string;
setTitle: (title: string) => void;
date: string;
setDate: (date: string) => void;
description: string;
setDescription: (description: string) => void;
markdown: string;
}
const HeaderInput = ({ title, setTitle, date, setDate, description, setDescription, markdown }: HeaderProps) => {
const router = useRouter();
const handleSubmitButtonClick = async () => {
// MDXEditor에서 이미지를 입력받을 때 imageUploadHandler에서 이미지의 blob url형태로 변환하게 해 두었다.
// 아래 코드를 이용해 blob url에서 이미지를 가져와 Object Storage에 업로드한다.
const imageUrls = markdown.match(/blob:(http|https):\/\/.*\/[a-zA-Z0-9]{8}-[a-zA-Z0-9]{4}-[a-zA-Z0-9]{4}-[a-zA-Z0-9]{4}-[a-zA-Z0-9]{12}/g) || [];
await Promise.all(imageUrls.map(async (url, index) => {
const image = await fetch(url).then((res) => res.blob());
const imageType = image.type.split('/')[1];
const response = await fetch(`/api/posts/${encodeURIComponent(title)}/images/${index + 1}.${imageType}`, {
method: 'PUT',
body: image,
headers: {
'Content-Type': 'image/*',
},
});
const json = await response.json();
markdown = markdown.replace(url, json.url);
return json.url;
}));
const frontmatter = {
title,
date,
description,
};
// generateMDXWithFrontmatter: title, date, description 데이터를 frontmatter형태로 mdx string에 추가해주는 함수
const md = await generateMDXWithFrontmatter(frontmatter, markdown);
// 클라이언트 컴포넌트이므로 사전 서명된 URL이 노출되지 않도록 백엔드로 요청을 보낸다.
await fetch('/api/posts', {
method: 'POST',
body: JSON.stringify({ "title": title, "data": md }),
})
.then(() => router.push(`/blog/${encodeURIComponent(title)}`));
};
return (
<div className={`flex flex-row justify-between items-end gap-[10%]`}>
<div className={`w-full`}>
<input
className={`font-semibold sm:text-5xl sm:leading-[4rem] text-4xl focus:outline-none w-full border-none bg-transparent`}
value={title}
onChange={(e) => setTitle(e.target.value)}
placeholder={"제목을 입력해주세요."}
/>
<div className={`font-extralight text-base mt-4 text-neutral-400 flex flex-row`}>
<div>Posted at </div>
<input
className={`focus:outline-none border-none bg-transparent tracking-tighter font-extralight text-base text-neutral-400`}
type={'datetime-local'} value={date} onChange={(e) => setDate(e.target.value)}
/>
</div>
<textarea
className={`font-extralight sm:text-base mt-2 focus:outline-none w-full h-12 border-none bg-transparent resize-none`}
value={description}
onChange={(e) => setDescription(e.target.value)}
placeholder={"포스트에 대한 간단한 설명을 입력해주세요."}
/>
</div>
<div className={`mb-8`}>
<button
className={`text-blue-600 p-2 rounded-md border border-blue-600 hover:bg-blue-600 hover:text-white transform duration-300 font-light`}
onClick={handleSubmitButtonClick}>
<ArrowRightUp className={`size-4`} strokeWidth={2}/>
</button>
</div>
</div>
);
};
export default HeaderInput;
app/api/posts/router.ts 에서 실제로 버킷에 업로드하는 기능을 담당한다.
업로드 후 revalidatePath를 이용해 /blog와 /blog/[slug] 경로의 캐시를 재검증해서 업로드된 포스트가 페이지에 반영되도록 했다.
// app/api/posts/router.ts

import { NextResponse } from "next/server";
import { revalidatePath } from "next/cache";

export async function POST(request: Request) {
	const data = await request.json();
	const title = data.title;
	const mdx = data.data;

    // request에서 title, mdx 가져와서 버킷에 PUT
	const response = await fetch(`${process.env.BUCKET_PRE_SIGNED_URL}/resume/posts/${encodeURIComponent(title)}/data.mdx`, {
		method: 'PUT',
		body: mdx,
		headers: {
			'Content-Type': 'text/plain, charset=utf-8',
		}
	});

    // 업로드한 뒤에 NextJS 캐시 재검증
	revalidatePath(`/blog`);
	revalidatePath(`/blog/${encodeURIComponent(title)}`);

	return NextResponse.json({
		"url": response.url,
		"status": 1
	})
});
결과
6. 포스트 삭제 기능
사전 서명된 URL은 CRUD 중 Read와 Create만 지원한다.
따라서 생성된 포스트를 삭제하려면 API Key를 발급받고 발급받은 API Key를 사용해 Oracle Cloud SDK로 해당 기능을 구현해야 한다.
우선, API Key를 발급받기 위해 Oracle Cloud > 도메인 > Default(새로운 도메인을 생성해도 무방) > 사용자 > API Key로 가준다.
API키 추가를 누르고 API 키에 사용할 키들을 두개 모두 다운받은 후에 다음을 누르면 아래와 같은 화면이 표시된다.
화면에 나오는 구성 파일을 복사해 ~/.oci에 config 파일을 만들어 붙여넣고, key_file의 경로를 아까 다운받은 pem 파일의 경로로 변경해준다.
# ~/.oci/config

[DEFAULT]
user=ocid1.user.oc1..****************************
fingerprint=****************************
tenancy=ocid1.tenancy.oc1..****************************
region=ap-seoul-1
key_file=~/.oci/priv.pem
그 다음, yarn add 명령어를 이용해 oci-common, oci-objectstorage, node-fetch, opossum를 설치해준다.
yarn add oci-common oci-objectstorage node-fetch@^2.6.5 opossum
설치가 다 됐다면 포스트 삭제 기능을 구현할 API Route를 만들고 SDK를 사용해 해당 기능을 구현해주자.
// app/api/posts/[post]/router.ts

import { NextResponse } from "next/server";
import { revalidatePath } from "next/cache";

import { compileMDX } from "next-mdx-remote/rsc";

import * as common from 'oci-common';
import * as os from 'oci-objectstorage';

export async function DELETE(request: Request, { params }: { params: { post: string } }) {
    // 인증 Provider 생성(config가 따로 없다면 알아서 ~/.oci경로에서 config를 가져옴)
	const provider = new common.ConfigFileAuthenticationDetailsProvider();

    // ObjectStorage Client 생성하고 위에서 만든 인증 Provider로 인증
	const client = new os.ObjectStorageClient({ authenticationDetailsProvider: provider });
	const deleteObjectRequest: os.requests.DeleteObjectRequest = {
		objectName: `resume/posts/${params.post}/data.mdx`,
		bucketName: process.env.BUCKET_NAME || '',
		namespaceName: process.env.BUCKET_NAMESPACE || '',
	};

	await client.deleteObject(deleteObjectRequest);

  // /blog 재검증해서 삭제 반영
	revalidatePath(`/blog`);

	return NextResponse.json({
		"status": 1
	})
};
DELETE API Route를 만들고 삭제 기능을 담당할 버튼을 만들어서 버튼 클릭 시 해당 API로 요청을 보내면 삭제 기능 구현이 끝난다.
결과

7. 배포를 위한 Dockerfile 작성
프로젝트를 Docker Image로 만들어 배포했다.
보안을 위해 .env에 있던 환경 변수는 ARG로 만들어 Image 빌드 시 입력하도록 했고 입력받은 ARG를 ENV로 설정해 빌드에 사용하게 만들었다.
next.config.mjs에서 output을 "standalone"로 했기 때문에 runner stage에서는 builder stage에서 빌드한 .next/standalone 폴더를 복사해야 한다.
// Dockerfile

FROM --platform=$BUILDPLATFORM node:20.9.0-alpine AS base

ARG NEXT_PUBLIC_API_URL
ARG BUCKET_PRE_SIGNED_URL

ENV NEXT_PUBLIC_API_URL=$NEXT_PUBLIC_API_URL
ENV BUCKET_PRE_SIGNED_URL=$BUCKET_PRE_SIGNED_URL

FROM base AS deps
RUN apk add --no-cache libc6-compat
WORKDIR /app

COPY .yarn ./.yarn
COPY .pnp.cjs .pnp.loader.mjs .yarnrc.yml package.json yarn.lock* ./

RUN yarn install --immutable

FROM base AS builder
WORKDIR /app

COPY . .

COPY --from=deps /app/.yarn ./.yarn
COPY --from=deps /app/.pnp.cjs /app/.pnp.loader.mjs ./

RUN yarn build

FROM base AS runner

LABEL email="[email protected]"
LABEL name="presso"

WORKDIR /app

ENV NODE_ENV=production
ENV NEXT_TELEMETRY_DISABLED=1

RUN addgroup --system --gid 1001 nodejs
RUN adduser --system --uid 1001 nextjs

COPY --from=builder /app/public* ./public
COPY --from=builder --chown=nextjs:nodejs /app/.next/standalone ./

RUN rm -rf .yarn
COPY --from=deps /app/.yarn ./.yarn
COPY --from=deps /app/.pnp.cjs /app/.pnp.loader.mjs /app/package.json  ./

COPY --from=builder --chown=nextjs:nodejs /app/.next/static ./.next/static

RUN yarn global add pm2

USER nextjs

ENV PORT=3000
ENV HOSTNAME=presso.ac
EXPOSE 3000

ENTRYPOINT ["pm2-runtime", "start", "server.js", "--node-args", "-r ./.pnp.cjs", "--env", "production", "--watch", "--name", "presso.ac"]
// docker-compose.yaml

services:
  presso.ac:
    image: pressodh/presso.ac:latest
    platform: linux/arm64/v8
    container_name: presso.ac
    restart: unless-stopped
    user: "1001"
    volumes:
      - type: bind
        source: /home/ubuntu/.oci/config
        target: /home/nextjs/.oci/config
      - type: bind
        source: /home/ubuntu/.oci/priv.pem
        target: /home/nextjs/.oci/priv.pem
    ports:
      - "3000:3000"
    networks:
      custom_network:
        ipv4_address: 172.24.0.3
    environment:
      NEXT_PUBLIC_API_URL: YOUR_API_URL
      BUCKET_PRE_SIGNED_URL: {YOUR_PRE_SIGNED_URL}
      BUCKET_NAME: {YOUR_BUCKET_NAME}
      BUCKET_NAMESPACE: {YOUR_BUCKET_NAMESPACE}

networks:
  custom_network:
    external: true
아래 명령어를 실행해 빌드해주고 docker-compose.yaml를 이용해 컨테이너를 실행해주자.
# buildx를 이용해 docker image 빌드
sudo docker buildx build --tag presso.ac --build-arg NEXT_PUBLIC_API_URL={YOUR_URL} --build-arg BUCKET_PRE_SIGNED_URL={YOUR_PRE_SIGNED_URL} -o type=docker .

# docker-compose.yaml로 컨테이너 실행
sudo docker compose up -d
결과
기존에는 위에서 설명했던 대로 포스트 생성, 수정, 삭제를 서버에 ssh로 접속해서 했어야 했는데 Oracle Cloud Object Storage와 MDXEditor를 사용하도록 변경하면서 웹 상에서 바로 가능해져 포스팅 시간이 크게 단축됐다.
페이지 로딩 시간도 기존에 2초가 걸리던 것이 200ms 가량으로 크게 단축되었다.
